
[ad_1]
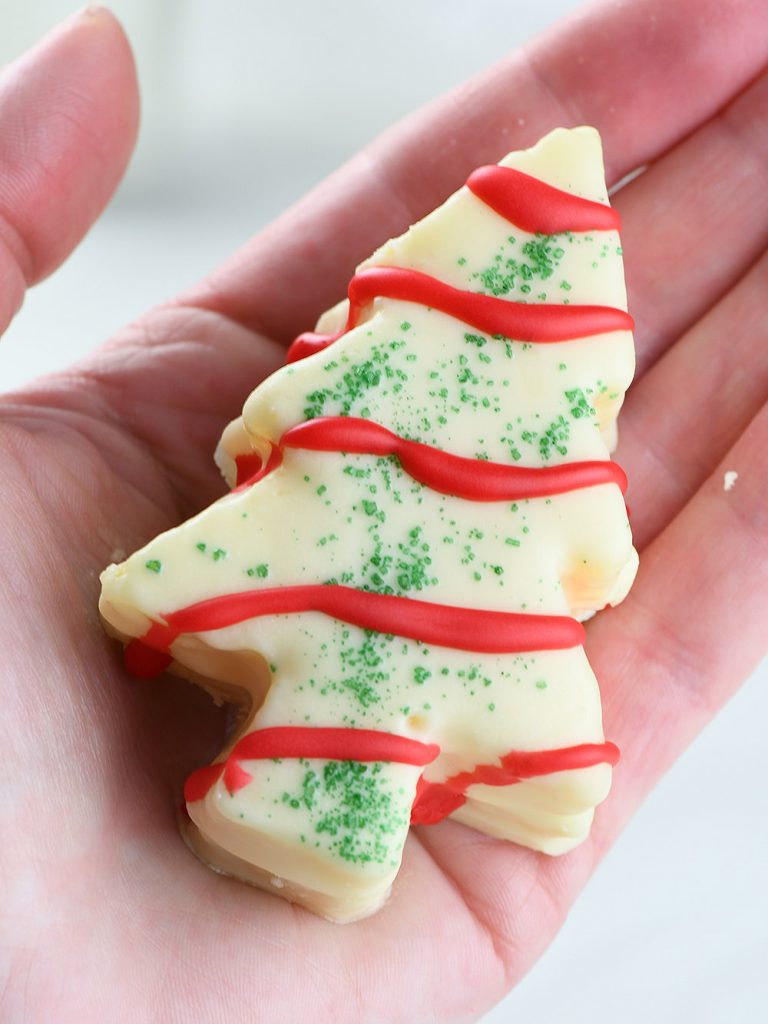
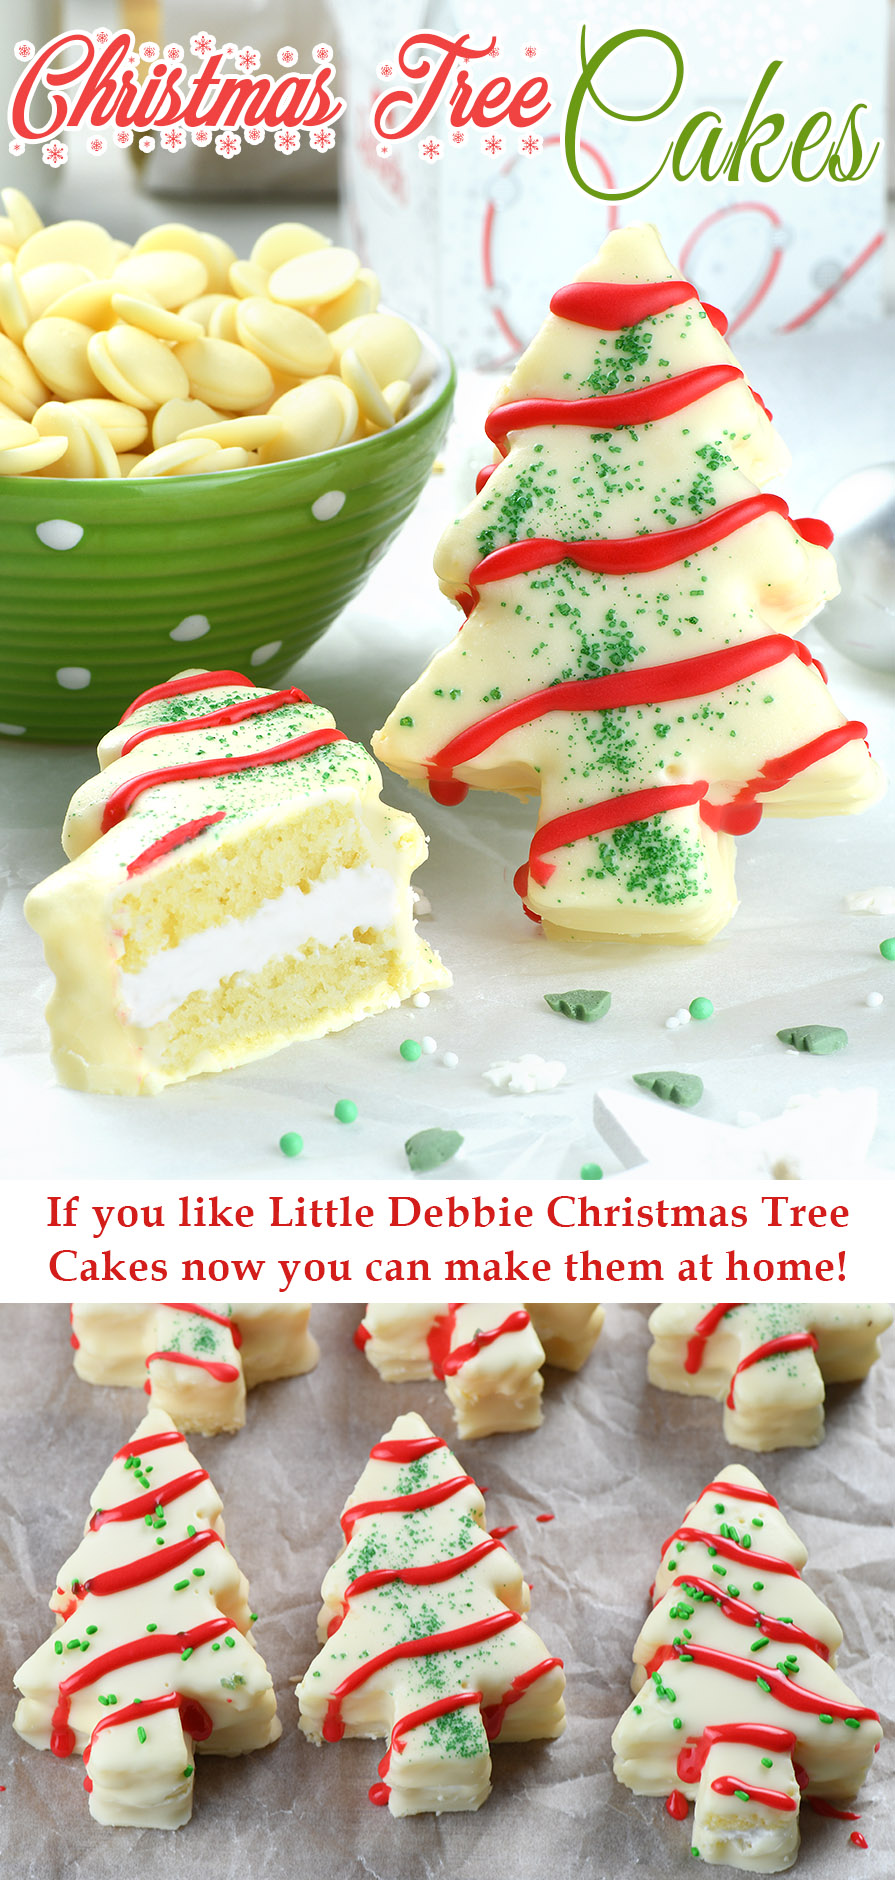
This homemade Christmas Tree Cakes recipe is a homemade version of childhood favorite holiday snack-Little Debbie Christmas Cakes. These are tree-shaped mini cakes with vanilla cream filling, and crunchy white coating garnished with green sprinkles and red icing.
Christmas Tree Vanilla Snack Cakes
Homemade Christmas Tree Cakes are adorable, so festive, and delicious.
These mini cakes will look great on your Christmas cookie tray. They are also perfect homemade gifts. After the coating and icing harden they are very simple to pack and transport.
Each Christmas tree cake has two thin cake layers with a cream filling sandwiched in the middle. The cake is soft and the filling is also very smooth and creamy. Soft, tender cake and filling make a perfect match with crunchy coating shells.
Homemade Little Debbie Inspired Christmas Tree Cakes
If you are a fan of storebought Little Debbie Christmas Tree Cakes you must try this homemade recipe inspired by a childhood favorite holiday treat.
Making a homemade version of these mini cakes is a little messy, but also very fun and brings up the
the true spirit of the holiday baking season.
Actually, the recipe is very simple starting with a box of cake mix. The filling is also super simple to make. However, cutting out the trees and dipping them into candy coating or almond bark might be quite sloppy. The cake is very tender and crumbles easily, but after dipping a few trees, you’ll probably master the technique.
Tips and Tricks for Making Perfect Mini Cakes
- When you assembled the cake layers and filling, cool the cake completely before start cutting out the tree shapes.
- Use a metal cookie cutter, it works better than plastic for this purpose.
- After you cut out the trees, use a knife or icing spatula to smooth the filling along the sides of the cakes if needed.
- Freeze the mini cakes before dipping them in white candy coating or almond bark to ensure the cakes don’t break and fall apart as you dip them.
- You can spoon the almond bark over the Christmas Tree cakes to make sure they are completely covered.
- After one layer of coating is firmed, repeat as many times as you want for thickness, but 2 is certainly enough for solid coating.
- Add sprinkles while the coating is still soft. It hardens quickly since the cakes are cooled.
- Wait until the coating has dried and hardened before applying the red icing stripes.
- If you have the kind of icing where you should just snip off the tip of the nozzle and then squeeze the icing out, cut the tip of the packet smaller than you think you need it and pipe a line onto a sheet of paper to test the flow, then cut more if needed.
- Hold the frosting at least a half-inch above the Christmas Tree so that the icing falls across the cake.
- Allow the red icing to dry before moving the cakes.
- After the coating and icing are dried and hardened, cakes are easy to move, pack or transport if needed.
Christmas Tree Cakes
Description
This homemade Christmas Tree Cakes recipe is a homemade version of childhood favorite holiday snack-Little Debbie Christmas Cakes.
Ingredients
Cake:
- 1 box vanilla (or yellow) cake mix
- Ingredients listed on the box(3 eggs, 1 cup water, 1/4 cup oil)
Filling:
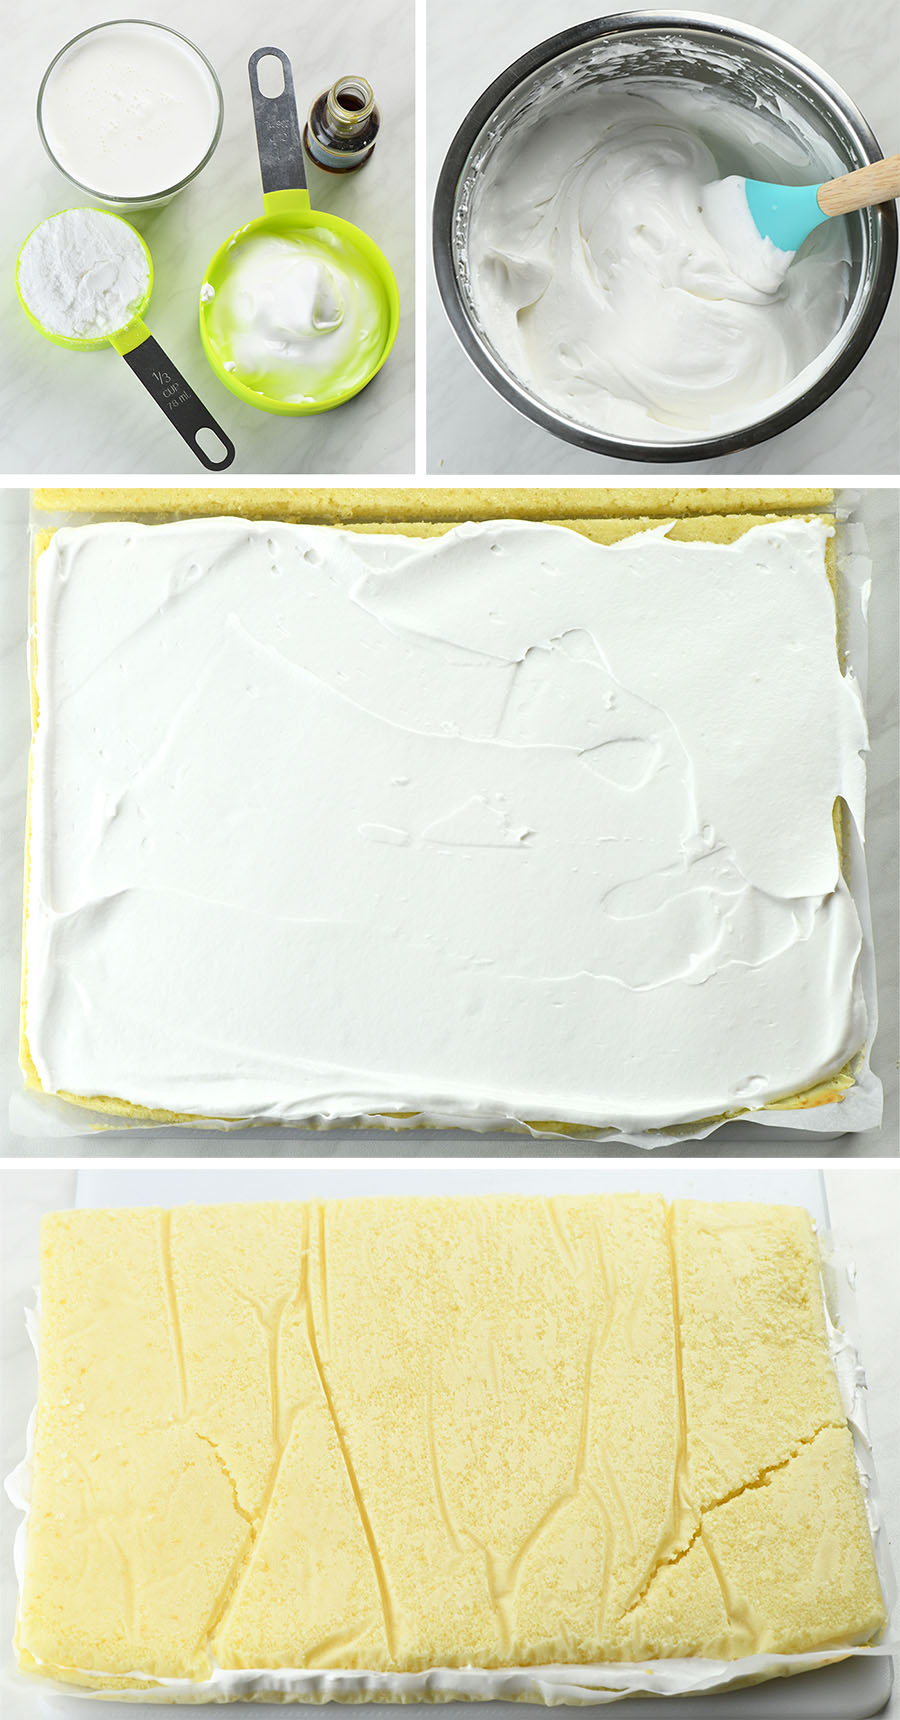
- 1 cup heavy whipping cream
- 1/3 cup powdered sugar
- 1 teaspoon vanilla extract
- 1/3 cup marshmallow fluff
Decoration:
- 16 oz. white candy coating or almond bark
- 2 Tablespoons shortening
- Storebought red icing
- Green sprinkles or green sanding sugar
Instructions
- Grease two 12×17-inch rimmed sheet pan with baking spray, and line the bottom with parchment paper.
- Preheat the oven to 350 F.
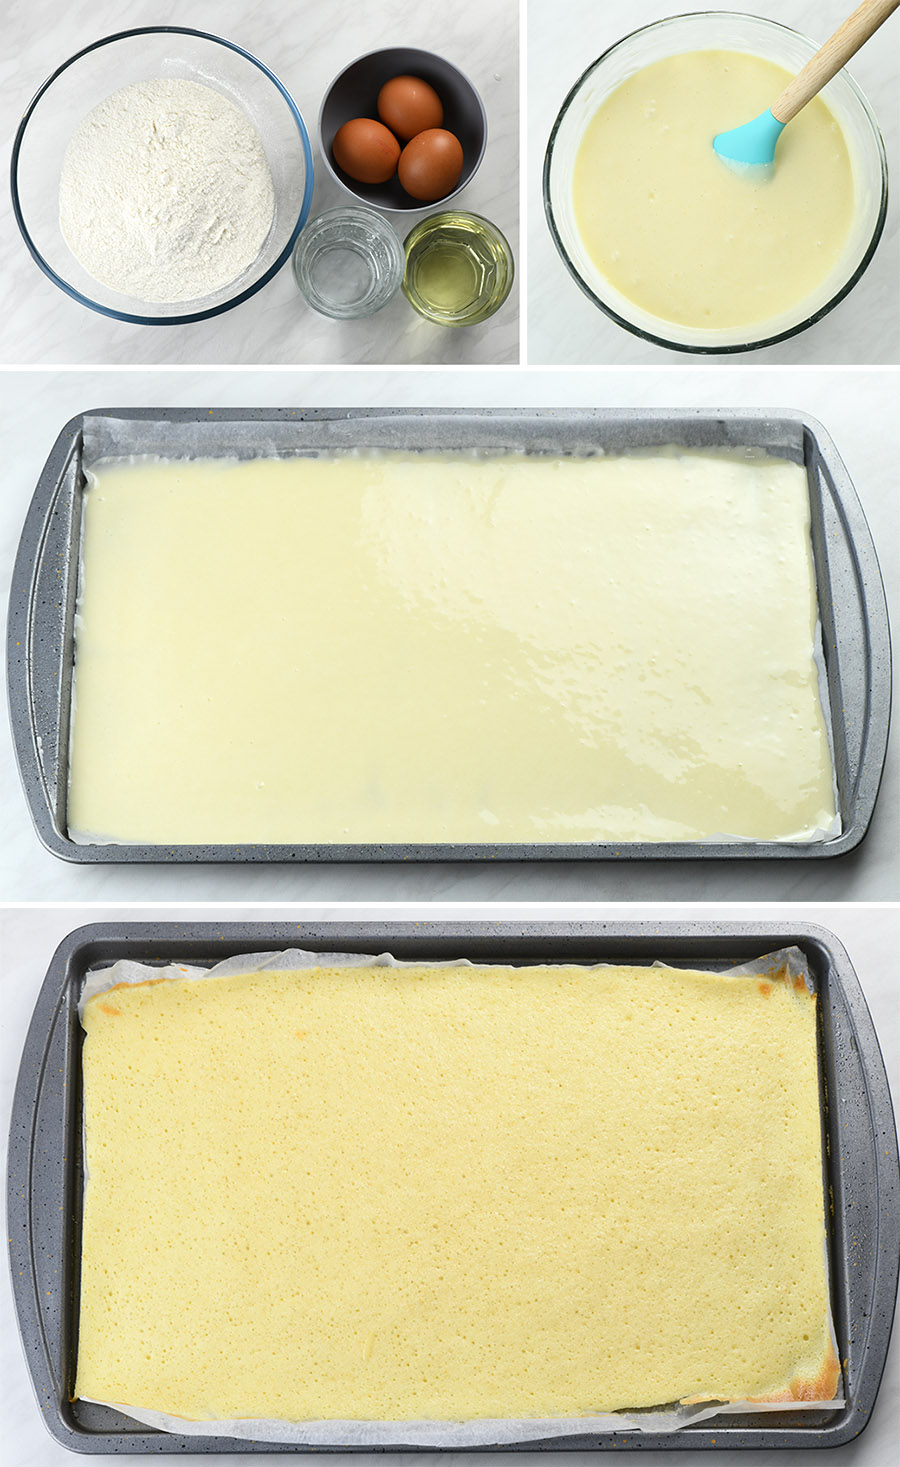
- Prepare the cake mix according to the package directions.
- Divide the cake mixture evenly between the pans, smooth the top, and bake for about 10 minutes or until it springs back in the center to the touch. Cool completely in the pans.
- To make the filling beat whipped cream, powdered sugar, and vanilla extract until soft peaks form, add marshmallow fluff and continue beating until stiff peaks form.
- Spread the filling in a thin layer onto one cake layer. Invert the second cake layer from the pan on top of the filling and peel off the paper.
- Chill in the fridge for 2-3 hours or preferably overnight.
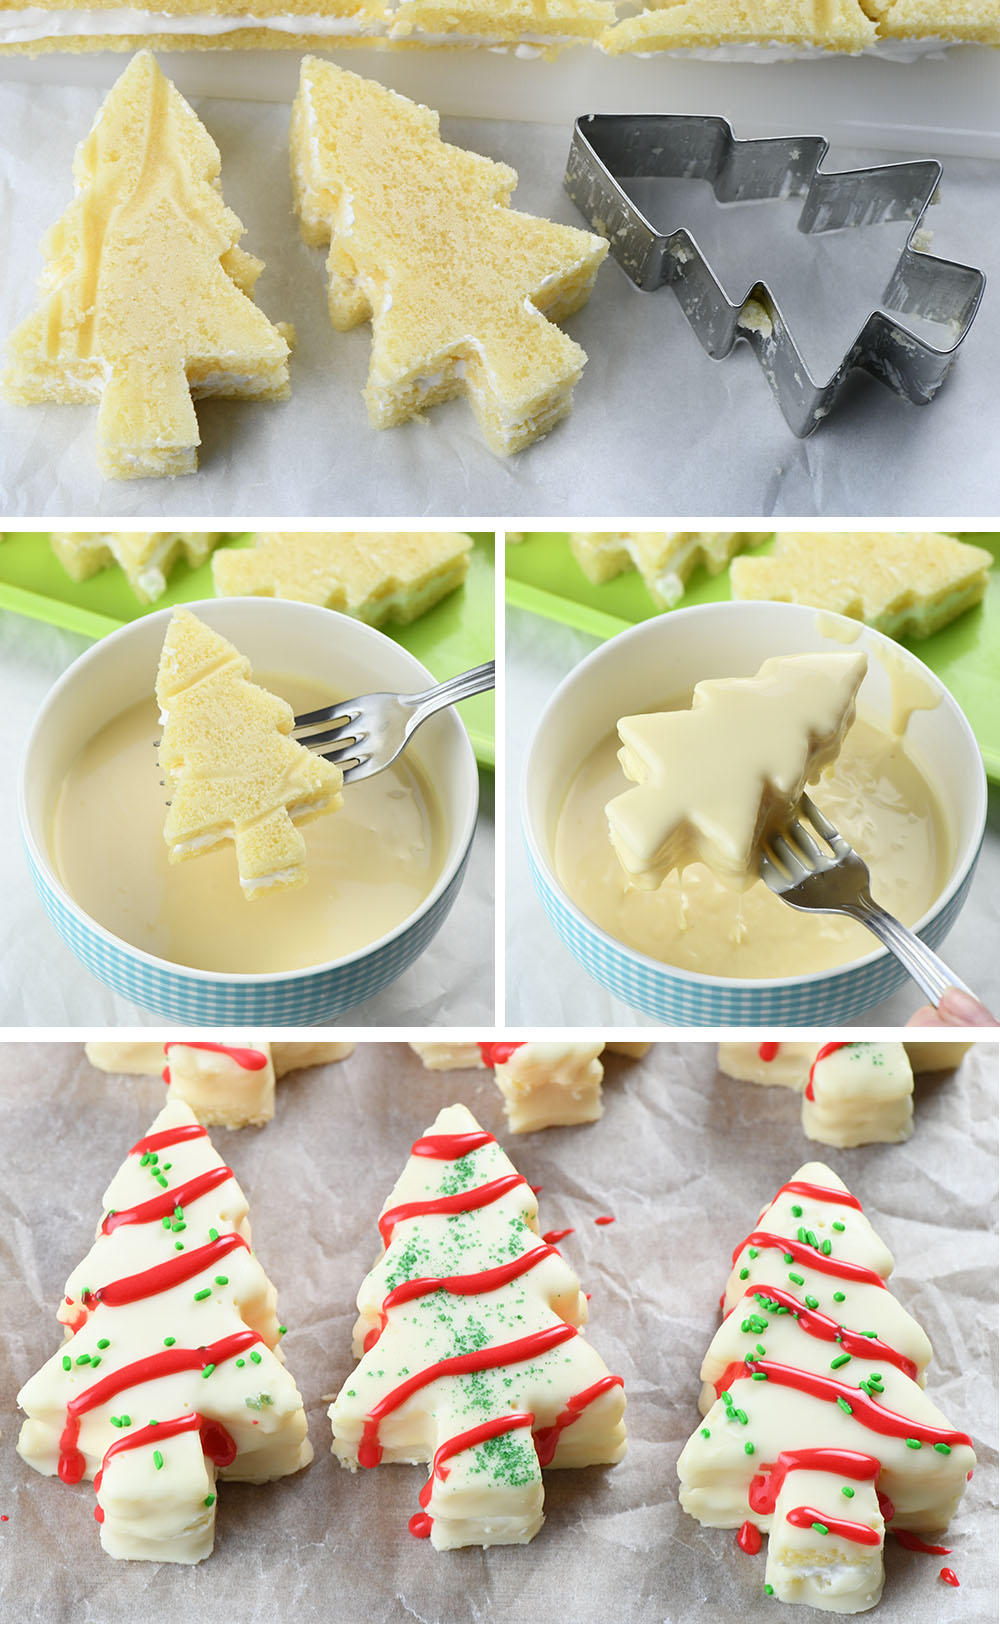
- When the cake is cooled and set, using a 3 or 4 inches cookie cutter cut out the trees and arrange them on a tray. Use a knife or icing spatula to smooth the whipped cream along the sides of the cakes.
- Freeze for at least 60-90 minutes before coating.
- When ready to decorate the trees, melt candy coating or almond bark according to a package’s directions, and stir in shortening to thin it out.
- Line a tray with parchment paper and remove the cakes from the freezer. Dip each cake into candy coating using two forks to flip and lift the cakes. Tap the fork on the edge of the bowl a few times to release excess coating, then place it onto a parchment-lined tray. Do this very gently because the cakes might crumble and fall apart.
- Sprinkle each tree with green sprinkles while the coating is still wet. It will harden quickly because the cakes are cold.
- Finally, decorate with red icing.
Notes
After you cut out the trees, you can crumble the leftovers of the cake and roll them into truffles.
[ad_2]
Source link